Have you recently purchased the M Audio Oxygen Pro mini and want to figure out how to use it with Ableton Live Lite 11? If so, you’re not alone! In this blog post, we will go over some of the essential functions and tips that I have learned while working with this keyboard.
Category: Recommended
So I needed to speed up / slow down an audio stream I had (speech generated with Flite TTS) and naively I thought it would suffice to simply sample it at the right intervals and interpolate.
I quickly discovered that just re-sampling won’t do because changing frequency also changes pitch proportionally. And then I discovered the world of Time Scaling in audio and it’s many algorithms and approaches to change the tempo without changing pitch.
To my surprise there were a number of ready made free libraries that do it, but the first one I tried – RubberBand – did not work out, it had too many dependencies I simply couldn’t be bothered compiling it for the Mac. But SoundTouch, well it had a Homebrew formula so it won by default.
I wrote a little simple wrapper around it, that interfaces nicely with Qt.
Let’s see what’s going on there
This is a quick tip. If you need to push a notification to your smartphone, or even send a file, I recently stumbled upon “Pushbullet“.
I was looking for a solution to send a file (with automatic download) to my phone, via bash script on my raspberry pi. I’ve been using pushover for a while, but as far as I know, it doesn’t support files
I have read the Pushbullet API, and came to realise that sending a file have 3 steps
1. Getting credentials to send the file
2. Upload the file to a remote server
3. Send a notification of “file” type with the download url
Of course, you can do 1 and 2 youself if you have access to a place which stores the file (I also managed to send a dropbox download link)
You need to sign up for Pushbullet via web, to get the api key, and also install the app on your smartphone (obviously)
So here is the bash script (It’s not elegant – but it works)
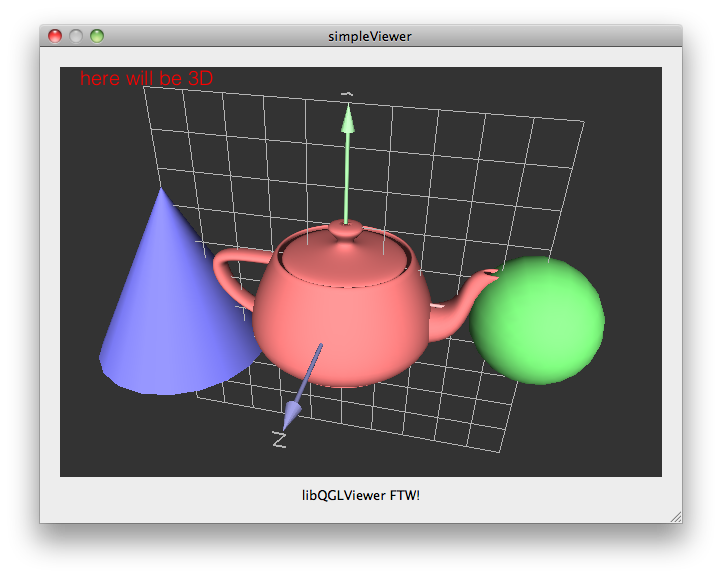
While looking for a very simple way to start up an OpenGL visualizer for quick 3D hacks, I discovered an excellent library called libQGLViewer, and I want to quickly show how easy it is to setup a 3D environment with it. This library provides an easy to access and feature-rich QtWidget you can embed in your UIs or use stand-alone (this may sound like a marketing thing, but they are not paying me anything 🙂
This is based on the library’s own examples at: http://www.libqglviewer.com/examples/index.html, and some of the examples that come with the library source itself.
Let’s see how it’s done
Hello
Quickly sharing some useful scripts I’ve “developed” over the summer to cope with some image resizing / video ripping / transcoding, etc.
Instead of using some specialized GUI software for transcoding I thought why not simply put useful options in the Windows file browser “Send To…” context menu. That way I can right-click the file I want to work with and just send it to some tool to do the job.
Here it is…
A few months back I placed an order for a raspberry pi. For those who don’t know what it is, it is a really cool project which is basically a computer for 35$ (Shipping for me almost doubled it, but that’s to be expected). It is a board, which as 256MB Ram, SD-Card slot, 2 USB Slots, an RCA Slot for analog video, and a headphone jack for analog audio.
It is originally a project for schools, to help today’s kids get started with (python, but not only) programming.
To be exact with what the project guys are describing it:
The Raspberry Pi is a credit-card sized computer board that plugs into a TV and a keyboard. It’s a miniature ARM-based PC which can be used for many of the things that a desktop PC does, like spreadsheets, word-processing and games. It also plays High-Definition video.
Here are some FAQs
The OS of this board is stored on an SD Card. I have bought a class 10 16gb SD Card off of eBay for this purpose.
So few days ago, the board arrived! I finally found myself playing with it, and it’s so much fun
Here are some common suggestions for usages:
Just wanted to put up a small tut on how to put an Arduino bootloader on an ATmega88.
I very roughly followed:Â
http://www.ladyada.net/learn/avr/avrdude.html
AndÂ
http://itp.nyu.edu/physcomp/Tutorials/ArduinoBreadboard (Although they make it way too complicated)
And ATMEL’s datasheet for ATmega88 is also very good to have open at all times:Â
http://www.atmel.com/Images/2545s.pdf
First, put everything on a breadboard: (This took me a while… Thanks D.Mellis and M.Feldmeier!!)
(Fritzing is awesome)
Online places to buy hardware
Hi
I always strive to be more open with my knowledge, so I decided to publish more posts of lesser “scientific” value and more just helpful stuff in various domains.
This time I want to share a list of website where you can purchase hardware for hacking and building.
Many are unhappy with the one-stop-shop Mc. Master-Carr and looking for an alternative. So here is what I found:
- MSC metalworking – seems to be about metal
- Small Parts – equivalent to Mc.Master-Carr
- Genuine Aircraft Hardware – they have a lot of stuff
- Production Tools Supply (PTS) – pretty much only tools
- Grainger – tools and parts as far as the eye can see
- MSC Industrial Supply – tools & parts
- Fastenal – tools & parts, kind of expensive
That’s it!
Roy.
Hello
This time I’ll discuss a basic implementation of a Structure from Motion method, following the steps Hartley and Zisserman show in “The Bible” book: “Multiple View Geometry”. I will show how simply their linear method can be implemented in OpenCV.
I treat this as a kind of tutorial, or a toy example, of how to perform Structure from Motion in OpenCV.
See related posts on using Qt instead of FLTK, triangulation and decomposing the essential matrix.
Update 2017: For a more in-depth tutorial see the new Mastering OpenCV book, chapter 3. Also see a recent post on upgrading to OpenCV3.
Let’s get down to business…
Just wanted to share of some code I’ve been writing.
So I wanted to create a food classifier, for a cool project down in the Media Lab called FoodCam. It’s basically a camera that people put free food under, and they can send an email alert to the entire building to come eat (by pushing a huge button marked “Dinner Bell”). Really a cool thing.
OK let’s get down to business.