If you’re a fan of OBS (Open Broadcaster Software), you may already be familiar with its vast library of plugins that enhance its functionality and provide added features. One such plugin that I recently developed is the URL API source plugin. This plugin allows you to fetch information from a URL and display it in your OBS stream. In this blog post, we will take a closer look at the source code for this plugin and understand how it works.
Category: graphics

In this blog post, we will take a closer look at the development of the OBS Background Removal Plugin, discussing its key components, functionalities, and the process behind building it. The plugin was created to address the need for virtual green screen and background removal capabilities in OBS (Open Broadcaster Software), a popular live streaming and recording software. With over 500,000 downloads and ongoing contributions from various developers, the OBS Background Removal Plugin has gained significant traction in the streaming community. Whether you’re interested in understanding how this plugin works or considering building a similar plugin yourself, this walkthrough will provide valuable insights.


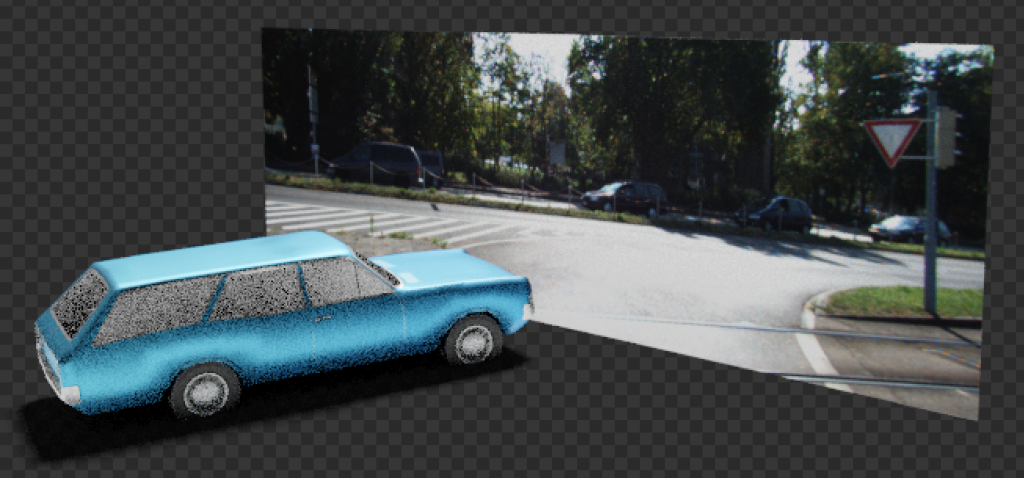
Trying to demonstrate how to do data augmentation on the KITTI stereo dataset, I found myself diving (too deeply) into Blender 3D.
What I set out to do is add a 3D object to an unsuspecting image from the KITTI dataset, to show that one way to get more training data is by synthesizing. I just put a 3D object in front of an image (say a 3D plane with the image as the texture) and done ✅ – I’ve augmented the image. Turns out it needs a bit more of Blender trickery. This is the real reason for this post.

ImageMagick has a built in Montage creating tool. It’s good enough for casual montaging, but it’s definitely suboptimal for packing varying size images.

Hey-o
Just sharing a code snippet to warp images to cylindrical coordinates, in case you’re stitching panoramas in Python OpenCV…
This is an improved version from what I had in class some time ago…
It runs VERY fast. No loops involved, all matrix operations. In C++ this code would look gnarly.. Thanks Numpy!
Enjoy!
Roy
First let me open by saying projector-camera calibration is NOT EASY. But it’s technically not complicated too.
It is however, an amalgamation of optimizations that accrue and accumulate error with each step, so that the end product is not far from a random guess.
So 3D reconstructions I was able to get from my calibrated pro-cam were just a distorted mess of points.
Nevertheless, here come the deets.
As part of the computer vision class I’m teaching at SBU I asked students to implement a segmentation method based on SLIC superpixels. Here is my boilerplate implementation.
This follows the work I’ve done a very long time ago (2010) on the same subject.
For graph-cut I’ve used PyMaxflow: https://github.com/pmneila/PyMaxflow, which is very easily installed by just pip install PyMaxflow
The method is simple:
- Calculate SLIC superpixels (the SKImage implementation)
- Use markings to determine the foreground and background color histograms (from the superpixels under the markings)
- Setup a graph with a straightforward energy model: Smoothness term = K-L-Div between superpix histogram and neighbor superpix histogram, and Match term = inf if marked as BG or FG, or K-L-Div between SuperPix histogram and FG and BG.
- To find neighbors I’ve used Delaunay tessellation (from scipy.spatial), for simplicity. But a full neighbor finding could be implemented by looking at all the neighbors on the superpix’s boundary.
- Color histograms are 2D over H-S (from the HSV)
Result
Hello,
I created a little video tutorial to model and render a folded piece of paper for a project I’m working on…
Here it is, enjoy!


